Netty服务端与客户端开发实践指南
Netty服务端与客户端开发实践指南
一、服务端开发详解
1. 核心启动流程
Netty服务端启动包含几个关键步骤,以下是标准模板代码:
// 1. 创建线程组
EventLoopGroup bossGroup = new NioEventLoopGroup(1);  // 接收连接
EventLoopGroup workerGroup = new NioEventLoopGroup();  // 处理业务

try {
    // 2. 配置服务端
    ServerBootstrap b = new ServerBootstrap();
    b.group(bossGroup, workerGroup)
     .channel(NioServerSocketChannel.class)
     .option(ChannelOption.SO_BACKLOG, 128)  // 连接队列大小
     .childOption(ChannelOption.TCP_NODELAY, true)  // 禁用Nagle算法
     .childHandler(new ChannelInitializer<SocketChannel>() {
         @Override
         protected void initChannel(SocketChannel ch) {
             ChannelPipeline p = ch.pipeline();
             p.addLast(new StringDecoder());  // 解码器
             p.addLast(new StringEncoder());  // 编码器
             p.addLast(new ServerHandler());  // 业务处理器
         }
     });

    // 3. 绑定端口
    ChannelFuture f = b.bind(8080).sync();
    f.channel().closeFuture().sync();
} finally {
    // 4. 优雅关闭
    workerGroup.shutdownGracefully();
    bossGroup.shutdownGracefully();
}
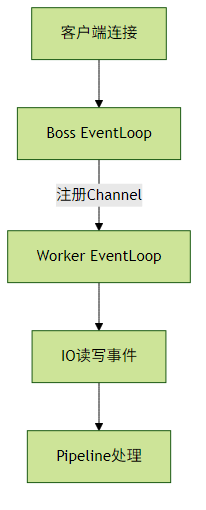
2. 线程模型图解

实践建议:
- BossGroup通常只需1个线程(NioEventLoop)
- WorkerGroup线程数建议设置为CPU核心数*2
- 耗时业务操作应使用独立业务线程池
3. 业务处理器实现
public class ServerHandler extends ChannelInboundHandlerAdapter {
    @Override
    public void channelRead(ChannelHandlerContext ctx, Object msg) {
        String request = (String) msg;
        System.out.println("收到请求: " + request);
        ctx.writeAndFlush("响应: " + request.toUpperCase());
    }

    @Override
    public void exceptionCaught(ChannelHandlerContext ctx, Throwable cause) {
        cause.printStackTrace();
        ctx.close();
    }
}
二、客户端开发详解
1. 连接流程实现
EventLoopGroup group = new NioEventLoopGroup();
try {
    Bootstrap b = new Bootstrap();
    b.group(group)
     .channel(NioSocketChannel.class)
     .option(ChannelOption.CONNECT_TIMEOUT_MILLIS, 5000)
     .handler(new ChannelInitializer<SocketChannel>() {
         @Override
         protected void initChannel(SocketChannel ch) {
             ch.pipeline()
               .addLast(new StringDecoder())
               .addLast(new StringEncoder())
               .addLast(new ClientHandler());
         }
     });

    ChannelFuture f = b.connect("127.0.0.1", 8080).sync();
    f.channel().closeFuture().sync();
} finally {
    group.shutdownGracefully();
}
2. 客户端处理器示例
public class ClientHandler extends SimpleChannelInboundHandler<String> {
    @Override
    protected void channelRead0(ChannelHandlerContext ctx, String msg) {
        System.out.println("服务器响应: " + msg);
    }

    @Override
    public void channelActive(ChannelHandlerContext ctx) {
        ctx.writeAndFlush("Hello Server!");
    }
}关键配置项:
CONNECT_TIMEOUT_MILLIS:连接超时时间SO_KEEPALIVE:启用TCP心跳检测WRITE_BUFFER_WATER_MARK:高低水位线控制
三、编解码器实践
1. 内置编解码器使用
// 服务端Pipeline配置
pipeline.addLast(new StringDecoder(CharsetUtil.UTF_8));
pipeline.addLast(new StringEncoder(CharsetUtil.UTF_8));

// 自定义对象编解码(需实现序列化)
pipeline.addLast(new ObjectEncoder());
pipeline.addLast(new ObjectDecoder(ClassResolvers.cacheDisabled(null)));
2. 自定义协议开发
协议格式示例:
+--------+--------+--------+
| 魔数(4) | 长度(4) | 数据(N) |
+--------+--------+--------+解码器实现:
public class CustomDecoder extends ByteToMessageDecoder {
    private static final int HEADER_SIZE = 8;
    private static final int MAGIC_NUMBER = 0x12345678;

    @Override
    protected void decode(ChannelHandlerContext ctx, ByteBuf in, List<Object> out) {
        if (in.readableBytes() < HEADER_SIZE) return;

        in.markReaderIndex();
        int magic = in.readInt();
        if (magic != MAGIC_NUMBER) {
            in.resetReaderIndex();
            throw new CorruptedFrameException("非法魔数");
        }

        int length = in.readInt();
        if (in.readableBytes() < length) {
            in.resetReaderIndex();
            return;
        }

        byte[] data = new byte[length];
        in.readBytes(data);
        out.add(new CustomMessage(data));
    }
}
四、粘包/拆包解决方案
1. 常见处理方式对比
| 方案 | 类 | 适用场景 | 特点 |
|---|---|---|---|
| 固定长度 | FixedLengthFrameDecoder | 定长协议 | 简单但浪费带宽 |
| 分隔符 | DelimiterBasedFrameDecoder | 文本协议 | 需处理转义字符 |
| 长度字段 | LengthFieldBasedFrameDecoder | 二进制协议 | 最灵活推荐方案 |
2. LengthFieldBasedFrameDecoder配置示例
// 参数说明:
// maxFrameLength: 最大帧长度
// lengthFieldOffset: 长度字段偏移量
// lengthFieldLength: 长度字段字节数
// lengthAdjustment: 长度字段值调整量
// initialBytesToStrip: 需要跳过的字节数
pipeline.addLast(new LengthFieldBasedFrameDecoder(
1024, 4, 4, 0, 8));典型配置案例:
对于前面自定义协议,配置应为:
new LengthFieldBasedFrameDecoder(1024, 4, 4, 0, 8)
五、最佳实践建议
资源管理
- 所有ByteBuf必须显式释放
- 使用
ByteBufUtil.ensureAccessible()检查缓冲区状态
异常处理
@Override
public void exceptionCaught(ChannelHandlerContext ctx, Throwable cause) {
    if (cause instanceof IOException) {
        log.warn("客户端强制关闭连接");
    } else {
        log.error("处理异常", cause);
    }
    ctx.close();
}
性能监控
pipeline.addLast("traffic", new ChannelTrafficShapingHandler(1024, 1024));优雅停机
Runtime.getRuntime().addShutdownHook(new Thread(() -> {
    bossGroup.shutdownGracefully();
    workerGroup.shutdownGracefully();
}));
通过以上实践,可以构建出高性能、稳定的Netty网络应用程序。建议根据实际业务需求选择合适的线程模型和协议处理方式,并通过压力测试验证系统表现。
评论已关闭