Vue路由配置指南:从基础到高级实践
Vue路由配置与设计:从基础模式到高级实践
一、路由模式解析
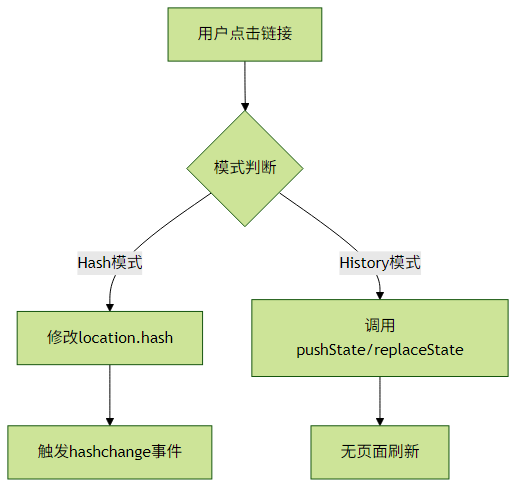
Hash模式 vs History模式
Vue Router提供了两种主要的路由模式,适用于不同的部署环境:
const router = createRouter({
  history: createWebHashHistory(), // Hash模式
  // 或
  history: createWebHistory(),    // History模式
  routes
})Hash模式特点:
- URL中包含
#符号,如http://example.com/#/home - 不需要服务器端配置,适合纯静态部署
- 通过监听
hashchange事件实现路由切换 - 不会发送完整的页面请求到服务器
History模式特点:
- 干净的URL,如
http://example.com/home - 需要服务器端支持(配置回退路由)
- 利用HTML5 History API实现
- 可能遇到404问题,需配置服务器重定向

实践建议:
- 开发环境可使用Hash模式避免配置麻烦
- 生产环境推荐History模式以获得更专业的URL
- 使用History模式时,确保服务器配置了所有路由回退到index.html
Abstract模式
Abstract模式主要用于非浏览器环境,如:
- 服务器端渲染(SSR)
- 移动端原生应用
- 单元测试环境
const router = createRouter({
  history: createMemoryHistory(), // Abstract模式
  routes
})特点:
- 不会修改浏览器地址栏
- 完全在内存中维护路由状态
- 适合需要路由功能但不依赖URL的环境
二、路由表结构设计
静态路由配置
基础路由配置是一个包含路由记录的数组:
const routes = [
  {
    path: '/',
    name: 'Home',
    component: HomeView
  },
  {
    path: '/about',
    name: 'About',
    component: () => import('../views/AboutView.vue')
  }
]
动态路由加载
对于大型应用,可采用路由懒加载优化性能:
const UserDetails = () => import('./views/UserDetails.vue')

const routes = [
  {
    path: '/users/:id',
    component: UserDetails
  }
]高级动态加载:可结合权限系统动态生成路由
// 从API获取用户权限路由
async function setupRouter() {
  const userRoutes = await fetchUserRoutes()
  userRoutes.forEach(route => {
    router.addRoute(route)
  })
}实践建议:
- 核心路由使用静态配置
- 按功能模块拆分路由文件
- 非核心路由使用动态加载减少初始包大小
- 动态路由考虑添加加载状态和错误处理
三、路由元信息应用
meta字段为路由提供了强大的扩展能力:
const routes = [
  {
    path: '/admin',
    meta: {
      requiresAuth: true,
      title: '管理后台',
      cache: false,
      permissions: ['admin']
    }
  }
]
常见元信息用途
权限控制:
router.beforeEach((to, from, next) => { if (to.meta.requiresAuth && !isAuthenticated()) { next('/login') } else { next() } })页面标题管理:
router.afterEach((to) => { document.title = to.meta.title || '默认标题' })缓存控制:
<template>
  <router-view v-slot="{ Component }">
 <keep-alive>
   <component :is="Component" v-if="$route.meta.cache" />
   <component :is="Component" v-if="!$route.meta.cache" />
 </keep-alive>
  </router-view>
</template>
实践建议:
- 为路由统一设计meta字段规范
- 将权限控制逻辑集中到路由配置中
- 使用TypeScript定义meta类型确保类型安全
- 避免在meta中存储过大或复杂的数据
四、进阶路由设计模式
嵌套路由设计
const routes = [
  {
    path: '/user/:id',
    component: UserLayout,
    children: [
      {
        path: 'profile',
        component: UserProfile
      },
      {
        path: 'posts',
        component: UserPosts
      }
    ]
  }
]
命名视图配置
const routes = [
  {
    path: '/settings',
    components: {
      default: UserSettings,
      helper: SettingsHelper
    }
  }
]
<template>
<router-view />
<router-view name="helper" />
</template>路由滚动行为控制
const router = createRouter({
  scrollBehavior(to, from, savedPosition) {
    if (savedPosition) {
      return savedPosition
    } else if (to.hash) {
      return {
        el: to.hash,
        behavior: 'smooth'
      }
    } else {
      return { top: 0 }
    }
  }
})
五、性能优化实践
路由懒加载分组:
const UserDetails = () => import(/* webpackChunkName: "user" */ './views/UserDetails.vue')预加载策略:
router.beforeEach((to, from, next) => { if (to.meta.preload) { const components = to.matched.map(record => record.components.default) components.forEach(component => { if (typeof component === 'function') { component() } }) } next() })- 路由分割:按功能模块拆分路由配置
六、TypeScript集成
import 'vue-router'

declare module 'vue-router' {
  interface RouteMeta {
    requiresAuth?: boolean
    title?: string
    cache?: boolean
    permissions?: string[]
  }
}

const router = createRouter({
  history: createWebHistory(),
  routes: [
    {
      path: '/admin',
      component: () => import('./AdminView.vue'),
      meta: {
        requiresAuth: true,
        title: 'Admin'
      }
    }
  ] as RouteRecordRaw[]
})
通过合理配置和设计Vue路由,可以构建出结构清晰、性能优异且易于维护的单页应用。根据项目规模选择合适的路由组织方式,并充分利用路由元信息等高级特性,能够显著提升开发效率和用户体验。
评论已关闭