Vuex测试与调试指南:从单元测试到时间旅行
Vuex 测试与调试完全指南:从单元测试到时间旅行
单元测试 Mutations 和 Actions
为什么需要测试 Vuex?
Vuex 作为 Vue 应用的状态管理核心,其稳定性和可靠性直接影响整个应用。良好的测试可以确保状态变更符合预期,避免难以追踪的 bug。
测试 Mutations
Mutations 是同步修改状态的函数,测试相对简单:
// store/mutations.js
export const mutations = {
  increment(state) {
    state.count++
  },
  setValue(state, value) {
    state.value = value
  }
}

// mutations.spec.js
import { mutations } from './mutations'

describe('mutations', () => {
  it('increment should increase count by 1', () => {
    const state = { count: 0 }
    mutations.increment(state)
    expect(state.count).toBe(1)
  })

  it('setValue should update state.value', () => {
    const state = { value: null }
    mutations.setValue(state, 'test')
    expect(state.value).toBe('test')
  })
})实践建议:
- 每个 mutation 应该只做一件事,保持单一职责
- 测试时只需关注输入 state 和 payload 后的输出 state
- 使用对象展开运算符创建测试用的 state 副本,避免测试间污染
测试 Actions
Actions 可能包含异步操作和复杂逻辑,测试需要更多技巧:
// store/actions.js
export const actions = {
  async fetchData({ commit }, payload) {
    try {
      const response = await api.fetch(payload)
      commit('setData', response.data)
      return response
    } catch (error) {
      commit('setError', error)
      throw error
    }
  }
}

// actions.spec.js
import { actions } from './actions'
import api from './api'

jest.mock('./api')

describe('actions', () => {
  it('fetchData commits data on success', async () => {
    const commit = jest.fn()
    const mockData = { id: 1, name: 'Test' }

    api.fetch.mockResolvedValue({ data: mockData })

    await actions.fetchData({ commit }, 1)

    expect(commit).toHaveBeenCalledWith('setData', mockData)
    expect(api.fetch).toHaveBeenCalledWith(1)
  })

  it('fetchData commits error on failure', async () => {
    const commit = jest.fn()
    const mockError = new Error('Failed')

    api.fetch.mockRejectedValue(mockError)

    await expect(actions.fetchData({ commit }, 1))
      .rejects.toThrow(mockError)

    expect(commit).toHaveBeenCalledWith('setError', mockError)
  })
})实践建议:
- 使用 jest.mock 模拟外部依赖
- 测试成功和失败两种场景
- 验证 commit 是否按预期被调用
- 对于异步操作,确保测试返回 Promise 或使用 async/await
模拟 Store 的测试策略
为什么要模拟 Store?
在组件测试中,我们通常不希望依赖真实的 Store,因为:
- 测试会更复杂且缓慢
- 难以隔离测试组件本身的行为
- 可能导致测试间的状态污染
基本模拟方法
// Component.vue
export default {
  computed: {
    ...mapState(['count']),
    ...mapGetters(['doubleCount'])
  },
  methods: {
    ...mapActions(['increment'])
  }
}

// Component.spec.js
import { shallowMount, createLocalVue } from '@vue/test-utils'
import Vuex from 'vuex'
import Component from './Component.vue'

const localVue = createLocalVue()
localVue.use(Vuex)

describe('Component', () => {
  let store
  let actions

  beforeEach(() => {
    actions = {
      increment: jest.fn()
    }

    store = new Vuex.Store({
      state: { count: 1 },
      getters: { doubleCount: () => 2 },
      actions
    })
  })

  it('renders count and doubleCount', () => {
    const wrapper = shallowMount(Component, { store, localVue })
    expect(wrapper.text()).toContain('1')
    expect(wrapper.text()).toContain('2')
  })

  it('calls increment action on button click', () => {
    const wrapper = shallowMount(Component, { store, localVue })
    wrapper.find('button').trigger('click')
    expect(actions.increment).toHaveBeenCalled()
  })
})
高级模拟技巧
对于更复杂的场景,可以使用 createStoreMock 辅助函数:
function createStoreMock(overrides = {}) {
  const defaultState = { count: 0, user: null }
  const defaultGetters = { isLoggedIn: false }
  const defaultActions = { login: jest.fn(), logout: jest.fn() }

  return {
    state: { ...defaultState, ...overrides.state },
    getters: { ...defaultGetters, ...overrides.getters },
    mutations: { ...overrides.mutations },
    actions: { ...defaultActions, ...overrides.actions },
    modules: { ...overrides.modules },
    strict: false
  }
}

// 使用示例
const store = new Vuex.Store(createStoreMock({
  state: { count: 5 },
  getters: { isLoggedIn: true }
}))实践建议:
- 为常用模块创建可重用的模拟工厂函数
- 在 beforeEach 中重置模拟状态,确保测试隔离
- 优先测试组件与 store 的交互,而非 store 内部逻辑
- 考虑使用 vuex-mock-store 等库简化流程
开发者工具的时间旅行调试
Vuex 开发者工具简介
Vue Devtools 提供了强大的 Vuex 调试功能,其中最引人注目的是"时间旅行"(Time Travel)调试。

时间旅行调试的核心功能
- 状态快照:记录每个 mutation 后的完整状态
- 回放/前进:跳转到任意历史状态
- 提交/回滚:将状态重置到特定点
- 导入/导出:保存和加载状态快照用于调试
如何使用时间旅行
- 安装 Vue Devtools 浏览器扩展
- 在开发模式下运行应用
- 打开开发者工具 → Vue → Vuex 标签页
- 查看 mutations 时间线
- 点击任意 mutation 跳转到对应状态
实际调试场景示例
假设我们有一个购物车应用,遇到如下问题:
- 添加商品后总价计算不正确
使用时间旅行调试步骤:
- 重现问题:添加几个商品到购物车
- 在 Devtools 中观察每个 ADD_TO_CART mutation 后的状态
- 发现某个 mutation 后计算出现偏差
- 回滚到问题前的状态,检查 payload 和 mutation 逻辑
- 确认是 mutation 中未正确处理商品折扣
实践建议
- 生产环境:确保禁用 Vuex 开发者工具(设置
strict: false) - 性能优化:大型应用中,避免在 mutation 中存储过大状态对象
调试技巧:
- 给 mutation 添加有意义的 type 便于识别
- 对复杂操作使用 action 组合多个 mutation
- 利用"提交状态"功能保存特定场景的快照
- 与测试结合:将 Devtools 导出的状态用于测试用例的初始状态
测试与调试的综合策略
分层测试:
- 单元测试:独立测试每个 mutation 和 action
- 集成测试:测试组件与 store 的交互
- E2E 测试:验证完整流程
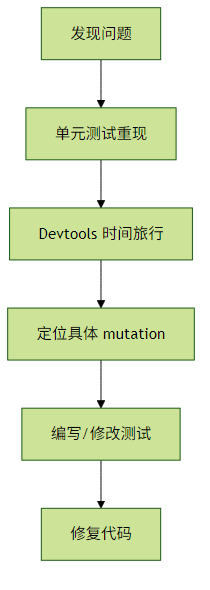
- 调试流程:

性能考量:
- 测试时避免不必要的 store 创建
- 使用 shallowMount 减少渲染开销
- 对大型 store 考虑模块化测试
通过结合全面的测试策略和强大的开发者工具,可以显著提高 Vuex 代码的质量和可维护性,为复杂应用提供可靠的状态管理保障。
评论已关闭