Vuex测试与调试实战:单元测试Mutations和Actions
Vuex 测试与调试实战指南
单元测试 Mutations 和 Actions
测试 Mutations
Mutations 是同步函数,测试相对简单。我们只需要验证给定输入是否产生正确的状态变更。
// store/mutations.js
export const mutations = {
  increment(state, payload) {
    state.count += payload.amount
  }
}

// mutations.spec.js
import { mutations } from './mutations'

test('increment mutation', () => {
  const state = { count: 0 }
  mutations.increment(state, { amount: 5 })
  expect(state.count).toBe(5)
})实践建议:
- 每个 mutation 应有独立的测试用例
- 测试边界情况(如负数、零值等)
- 验证 mutation 是否直接修改了 state
测试 Actions
Actions 通常包含异步逻辑,测试时需要额外处理:
// store/actions.js
export const actions = {
  async fetchUser({ commit }, userId) {
    const user = await api.fetchUser(userId)
    commit('SET_USER', user)
  }
}

// actions.spec.js
import { actions } from './actions'
import api from './api'

jest.mock('./api')

test('fetchUser action', async () => {
  const commit = jest.fn()
  const user = { id: 1, name: 'John' }

  api.fetchUser.mockResolvedValue(user)

  await actions.fetchUser({ commit }, 1)

  expect(api.fetchUser).toHaveBeenCalledWith(1)
  expect(commit).toHaveBeenCalledWith('SET_USER', user)
})实践建议:
- 使用 jest.mock 模拟外部依赖
- 验证 commit 是否被正确调用
- 测试成功和失败两种情况
- 考虑使用 async/await 处理异步逻辑
模拟 Store 的测试策略
1. 创建测试用的 Vuex Store
import { createStore } from 'vuex'

const createTestStore = (overrides = {}) => {
  const defaultStoreConfig = {
    state: () => ({ count: 0 }),
    mutations: {
      increment(state) { state.count++ }
    },
    actions: {
      incrementAsync({ commit }) {
        setTimeout(() => commit('increment'), 100)
      }
    }
  }

  return createStore({
    ...defaultStoreConfig,
    ...overrides
  })
}
2. 组件测试中的 Store 模拟
import { mount } from '@vue/test-utils'
import { createStore } from 'vuex'
import MyComponent from './MyComponent.vue'

test('renders count from store', () => {
  const store = createStore({
    state() {
      return { count: 10 }
    }
  })

  const wrapper = mount(MyComponent, {
    global: {
      plugins: [store]
    }
  })

  expect(wrapper.text()).toContain('Count: 10')
})
3. 使用 vuex-mock-store 进行轻量级测试
import { createStoreMock } from '@vue-store-mock/core'

test('component with store mock', () => {
  const store = createStoreMock({
    state: { count: 5 },
    getters: {
      doubleCount: () => 10
    }
  })

  const wrapper = mount(MyComponent, {
    global: {
      mocks: { $store: store }
    }
  })

  expect(wrapper.text()).toContain('Count: 5')
  expect(store.commit).toHaveBeenCalledTimes(0)
})实践建议:
- 根据测试需求选择适当的模拟策略
- 集成测试使用真实 Store
- 单元测试使用模拟 Store
- 考虑创建 Store 工厂函数提高复用性
开发者工具的时间旅行调试
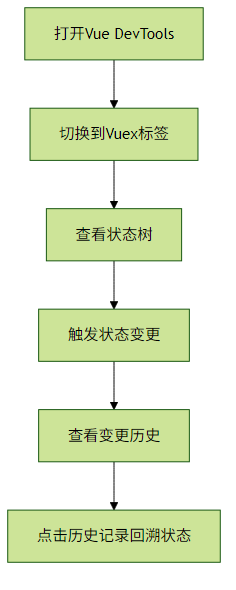
Vue DevTools 提供了强大的时间旅行调试功能,可以回溯和重放状态变更。
1. 基本使用流程

2. 高级调试技巧
提交快照:
- 在关键操作前手动提交状态快照
- 比较不同时间点的状态差异
导入/导出状态:
- 导出当前状态用于测试用例
- 导入特定状态重现问题
时间旅行操作:
- 回滚到特定 mutation
- 跳过中间状态直接查看结果
- 重放一系列变更
3. 实战调试示例
// 在组件中添加调试钩子
export default {
  mounted() {
    // 保存初始状态
    this.$store.subscribe((mutation, state) => {
      if (mutation.type === 'importantChange') {
        console.log('Important change:', state)
        debugger // 触发断点
      }
    })
  }
}实践建议:
- 为重要 mutation 添加描述性 type
- 在开发环境启用严格模式
- 结合 console.log 和 DevTools 进行调试
- 使用 subscribe 方法监听状态变更
测试与调试最佳实践
分层测试策略:
- 单元测试:独立测试 mutations 和 actions
- 集成测试:验证组件与 Store 的交互
- E2E 测试:验证完整流程
- 调试技巧:

性能考量:
- 避免在测试中创建不必要的 Store 实例
- 使用 jest.spyOn 替代完整 mock 提高性能
- 考虑并行执行不依赖共享状态的测试
通过合理的测试策略和有效的调试技巧,可以显著提高 Vuex 代码的质量和可维护性。
评论已关闭