JavaScript高级可视化与图形实践指南
JavaScript 可视化与图形高级实践指南
一、Canvas 高级渲染技巧
1.1 离屏渲染优化
Canvas 的离屏渲染技术可以显著提升复杂场景的绘制性能:
// 创建离屏Canvas
const offscreenCanvas = document.createElement('canvas');
offscreenCanvas.width = 800;
offscreenCanvas.height = 600;
const offscreenCtx = offscreenCanvas.getContext('2d');

// 在离屏Canvas上绘制复杂图形
function renderOffscreen() {
  offscreenCtx.clearRect(0, 0, 800, 600);
  // 复杂绘制操作...
}

// 主Canvas只进行简单的绘制
function render() {
  ctx.clearRect(0, 0, canvas.width, canvas.height);
  ctx.drawImage(offscreenCanvas, 0, 0);
  requestAnimationFrame(render);
}实践建议:
- 对静态或变化较少的内容使用离屏渲染
- 合理控制离屏Canvas的分辨率,避免内存浪费
- 结合
requestAnimationFrame实现动画效果
1.2 粒子系统实现
class Particle {
  constructor(x, y) {
    this.x = x;
    this.y = y;
    this.size = Math.random() * 5 + 1;
    this.speedX = Math.random() * 3 - 1.5;
    this.speedY = Math.random() * 3 - 1.5;
  }

  update() {
    this.x += this.speedX;
    this.y += this.speedY;
    if (this.size > 0.2) this.size -= 0.1;
  }

  draw(ctx) {
    ctx.fillStyle = `rgba(255, 255, 255, ${this.size})`;
    ctx.beginPath();
    ctx.arc(this.x, this.y, this.size, 0, Math.PI * 2);
    ctx.fill();
  }
}
二、WebGL 基础交互
2.1 着色器基础
顶点着色器和片段着色器示例:
// 顶点着色器
attribute vec2 position;
uniform mat3 transformMatrix;

void main() {
  vec3 transformed = transformMatrix * vec3(position, 1);
  gl_Position = vec4(transformed.xy, 0, 1);
}

// 片段着色器
precision mediump float;
uniform vec4 color;

void main() {
  gl_FragColor = color;
}
2.2 交互实现
// 鼠标交互处理
canvas.addEventListener('mousemove', (e) => {
  const rect = canvas.getBoundingClientRect();
  const x = e.clientX - rect.left;
  const y = e.clientY - rect.top;

  // 转换为WebGL坐标
  const webglX = (x / canvas.width) * 2 - 1;
  const webglY = 1 - (y / canvas.height) * 2;

  // 更新uniform变量
  gl.uniform2f(mousePosLoc, webglX, webglY);
});性能优化建议:
- 使用顶点缓冲对象(VBO)存储静态几何数据
- 合并绘制调用减少状态切换
- 使用
requestAnimationFrame进行动画更新
三、数据可视化库核心原理
3.1 D3.js 数据绑定机制
// 数据绑定示例
const data = [10, 20, 30, 40, 50];

const circles = d3.select("svg")
  .selectAll("circle")
  .data(data);

// 进入阶段
circles.enter()
  .append("circle")
  .attr("r", d => d)
  .attr("cx", (d, i) => i * 50 + 30)
  .attr("cy", 50);

// 更新阶段
circles.attr("fill", "blue");

// 退出阶段
circles.exit().remove();
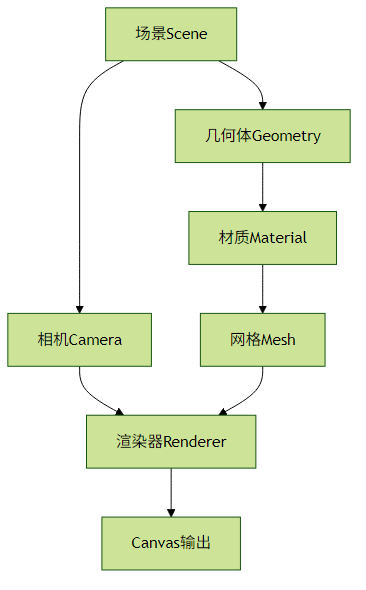
3.2 Three.js 渲染管线

Three.js 性能优化:
- 使用
InstancedMesh渲染大量相似对象 - 合理使用
BufferGeometry减少内存占用 - 实现
raycaster进行高效交互检测
3.3 可视化实践案例
// 使用D3实现力导向图
const simulation = d3.forceSimulation(nodes)
  .force("link", d3.forceLink(links).id(d => d.id))
  .force("charge", d3.forceManyBody().strength(-100))
  .force("center", d3.forceCenter(width / 2, height / 2));

// 使用Three.js实现3D柱状图
const createBars = (data) => {
  data.forEach((value, i) => {
    const height = value * 5;
    const geometry = new THREE.BoxGeometry(5, height, 5);
    const material = new THREE.MeshBasicMaterial({color: 0x00ff00});
    const bar = new THREE.Mesh(geometry, material);
    bar.position.set(i * 7 - data.length * 3.5, height/2, 0);
    scene.add(bar);
  });
};最佳实践:
- 大数据集优先考虑WebGL方案
- 交互式可视化注意事件委托优化
- 移动端注意性能限制和触摸事件处理
- 复杂动画使用GSAP等专业动画库
四、性能监控与调试
// 帧率监控
let lastTime = performance.now();
let frameCount = 0;

function monitorFPS() {
  const now = performance.now();
  frameCount++;

  if (now > lastTime + 1000) {
    const fps = Math.round((frameCount * 1000) / (now - lastTime));
    console.log(`FPS: ${fps}`);
    frameCount = 0;
    lastTime = now;
  }

  requestAnimationFrame(monitorFPS);
}调试工具推荐:
- Chrome Performance面板分析渲染性能
- Three.js官方调试工具
three.js/inspector - WebGL Inspector扩展程序
通过掌握这些高级技巧,开发者可以创建性能卓越、交互丰富的可视化应用,满足从简单的数据展示到复杂的3D场景等各种需求。
评论已关闭